Proxmox VE web 界面添加硬件温度显示
为 Proxmox VE 的 web 管理界面添加硬件温度显示
安装温度检测工具
CPU 及主板温度检测:lm-sensors
root@pve:~# apt install lm-sensors安装完成后执行 sensors-detect 进行传感器探测,通常情况下全部默认选择 yes 即可
探测完成后执行 sensors 测试传感器
root@pve:~# sensors
acpitz-acpi-0
Adapter: ACPI interface
temp1:        +56.0°C  (crit = +120.0°C)

coretemp-isa-0000
Adapter: ISA adapter
Package id 0:  +57.0°C  (high = +84.0°C, crit = +100.0°C)
Core 0:        +57.0°C  (high = +84.0°C, crit = +100.0°C)
Core 1:        +55.0°C  (high = +84.0°C, crit = +100.0°C)
Core 2:        +52.0°C  (high = +84.0°C, crit = +100.0°C)
Core 3:        +54.0°C  (high = +84.0°C, crit = +100.0°C)
在如上输出中,“acpitz-acpi-0” 是主板温度,“coretemp-isa-0000” 是 CPU 温度
硬盘温度检测:hddtemp
root@pve:~# apt install hddtemp安装完成后执行 hddtemp /dev/sd? 测试传感器
root@pve:~# hddtemp /dev/sd?
/dev/sda: WDC WD40EZRZ-00WN9B0: 29°C
/dev/sdb: ADATA SP600: 26°C
/dev/sdc: WD2500: 29°C
/dev/sdd: ADATA SP900: 38°C
由于 PVE 的 web 服务以用户 www-data 身份运行,需要修改 hddtemp 的权限
root@pve:~# chmod +s /usr/sbin/hddtemp编辑 PVE web 服务文件
Nodes.pm
编辑文件 /usr/share/perl5/PVE/API2/Nodes.pm,跳转到 my $dinfo = df('/', 1); 位置,编辑成如下所示
# ...[OMITTED]...
        $res->{pveversion} = PVE::pvecfg::package() . "/" .
            PVE::pvecfg::version_text();

        $res->{temperatures} = `sensors`;  # 添加此行以获取 CPU 与主板温度

        $res->{hdd_temperatures} = `hddtemp /dev/sd?`;  # 添加此行以获取硬盘温度

        my $dinfo = df('/', 1);     # output is bytes
# ...[OMITTED]...
pvemanagerlib.js
修改页面样式以完整显示数据
编辑文件 /usr/share/pve-manager/js/pvemanagerlib.js,跳转到 gettext('Status') + ': ' + zpool, 位置,编辑成如下所示
// ...[OMITTED]...
 var win = Ext.create('Ext.window.Window', {
            modal: true,
            width: 800,
            height: 500,  // 原始值为 400
            resizable: true,
            layout: 'fit',
            title: gettext('Status') + ': ' + zpool,
            items:[{
// ...[OMITTED]...
跳转到 widget.pveNodeStatus 位置,编辑成如下所示
// ...[OMITTED]...
Ext.define('PVE.node.StatusView', {
    extend: 'PVE.panel.StatusView',
    alias: 'widget.pveNodeStatus',

    height: 400,  // 原始值为 300
    bodyPadding: '20 15 20 15',

    layout: {
// ...[OMITTED]...
两处 height 的值需按情况修改,每多一行数据增加 20
例如有 1 行 CPU 与主板温度数据、3 行硬盘温度数据(3 块硬盘),即为 480 与 380
添加显示内容
跳转到 PVE Manager Version 位置,编辑成如下所示
// ...[OMITTED]...
        {
            itemId: 'version',
            colspan: 2,
            printBar: false,
            title: gettext('PVE Manager Version'),
            textField: 'pveversion',
            value: ''
        },  // 注意添加逗号
        {
            itemId: 'temperatures',
            colspan: 2,
            printBar: false,
            title: gettext('Temperatures'),
            textField: 'temperatures',
            renderer: function(value) {
                value = value.replace(/Â/g, '');
                let data = [];
                let cpus = value.matchAll(/^coretemp-isa-(\d{4})$\n.*?\n((?:Package|Core)[\s\S]*?^\n)+/gm);
                for (const cpu of cpus) {
                    let cpuNumber = parseInt(cpu[1], 10);
                    data[cpuNumber] = {
                        packages: [],
                        cores: []
                    };

                    let packages = cpu[2].matchAll(/^Package id \d+:\s*([^°]+).*$/gm);
                    for (const package of packages) {
                        data[cpuNumber]['packages'].push(package[1]);
                    }

                    let cores = cpu[2].matchAll(/^Core \d+:\s*([^°]+).*$/gm);
                    for (const core of cores) {
                        data[cpuNumber]['cores'].push(core[1]);
                    }
                }

                let output = '';
                for (const [i, cpu] of data.entries()) {
                    output += `CPU ${i}: `;
                    if (cpu.packages.length > 0) {
                        for (const packageTemp of cpu.packages) {
                            output += `${packageTemp}°C `;
                        }
                    }
                    if (cpu.cores.length > 0) {
                        output += '(';
                        for (const coreTemp of cpu.cores) {
                            output += `${coreTemp}, `;
                        }
                        output = output.slice(0, -2);
                        output += ')°C';
                    }
                    output += ' | ';
                }

                let boardTemp = value.match(/^acpitz-acpi-\d+$\n.*?\n^temp1:\s*([^°]+).*$/m);
                if (boardTemp.length > 0) {
                    output += `Board: ${boardTemp[1]}°C | `
                }
                output = output.slice(0, -3);

                return output;
            }
        },
        {
            itemId: 'hdd-temperatures',
            colspan: 2,
            printBar: false,
            title: gettext('HDD Temperatures'),
            textField: 'hdd_temperatures',
            renderer: function(value) {
                value = value.replace(/Â/g, '');
                return value.replace(/\n/g, '<br>')
            }
        }
    ],
// ...[OMITTED]...
其中处理数据的正则式与返回值可能需按实际情况进行修改
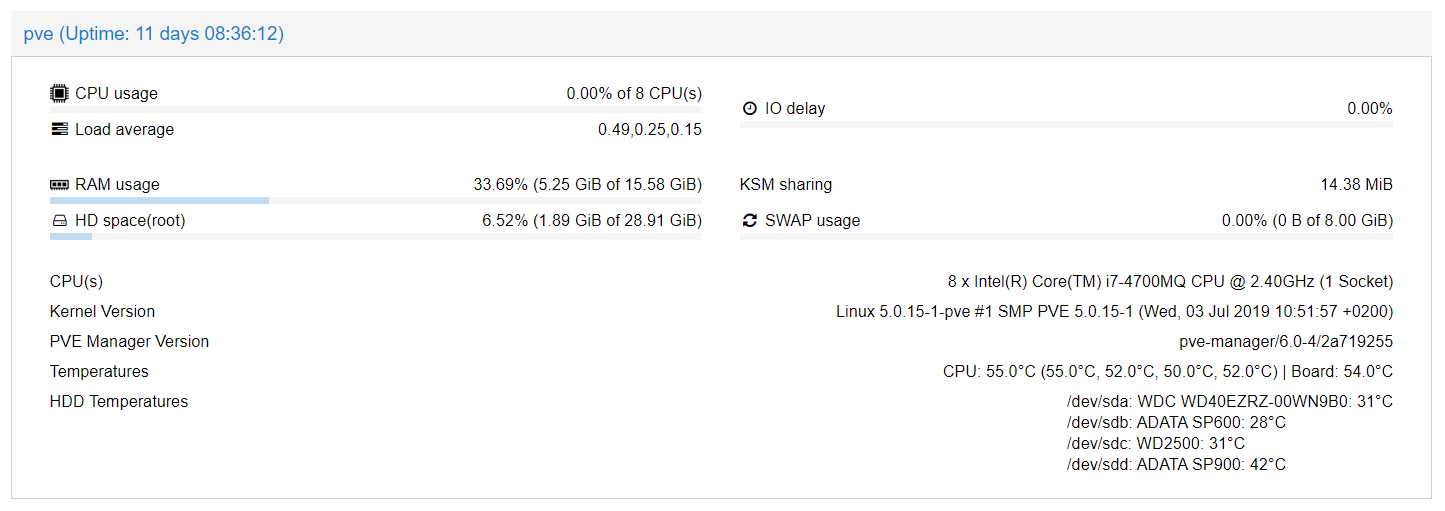
完成
执行 systemctl restart pveproxy 重启 PVE web 服务
在浏览器中清除 PVE 控制台的缓存,重新加载即可在节点概要显示温度信息
如果硬盘温度信息中出现 “” 字符,可能是某处编码设置有问题,可在 pvemanagerlib.js 的 renderer 函数开头添加 value = value.replace(/Â/g, '');